In the last post, I covered good places to find 3D fossils. This post I want to cover how to make your own 3D images using photogrammetry. Photogrammetry is the process of turning a bunch of 2D photos into an interactive 3D image. Since I am not an expert on doing this, I am simply going to link you to a series of tutorials put together by Dr. Heinrich Mallison. Dr. Mallison describes himself as “a dinosaur biomech guy working at the Museum für Naturkunde Berlin.” If you would like to read more of his work, I suggest you check out his blog, Dinosaurpaleo, in which he blogs about his research. He also has links to a lot of his research papers and will happily send you pdfs of any other papers of his you want. Dr. Mallison is an expert on making 3D reconstructions using photogrammetry and has already done the legwork to give you all the information you need to get started.

Getting the Right Photo
Photogrammetry tutorial 1 begins with the logical starting point: the equipment. He recommends getting a good DSLR camera with a Life View touchscreen, circular polarizing filter, good tripod, turntable, and a ring flash for optimal pictures. Also, don’t forget the scale bar and stickers. The stickers will be helpful if you have to take our photos in two sets (for instance, if you have to move the object between sets). This will require making two models and stitching them together, which will be aided by small stickers that will serve as easily findable common points so you can properly align the models.
Photogrammetry tutorial 2 discusses general suggestions on how to take good pictures that you can use for the 3D model. Here he gives advice, such as maximizing the F-number to increase depth of field, balancing your exposure, the use of HDR (high dynamic range) images, and proper cropping of the images.
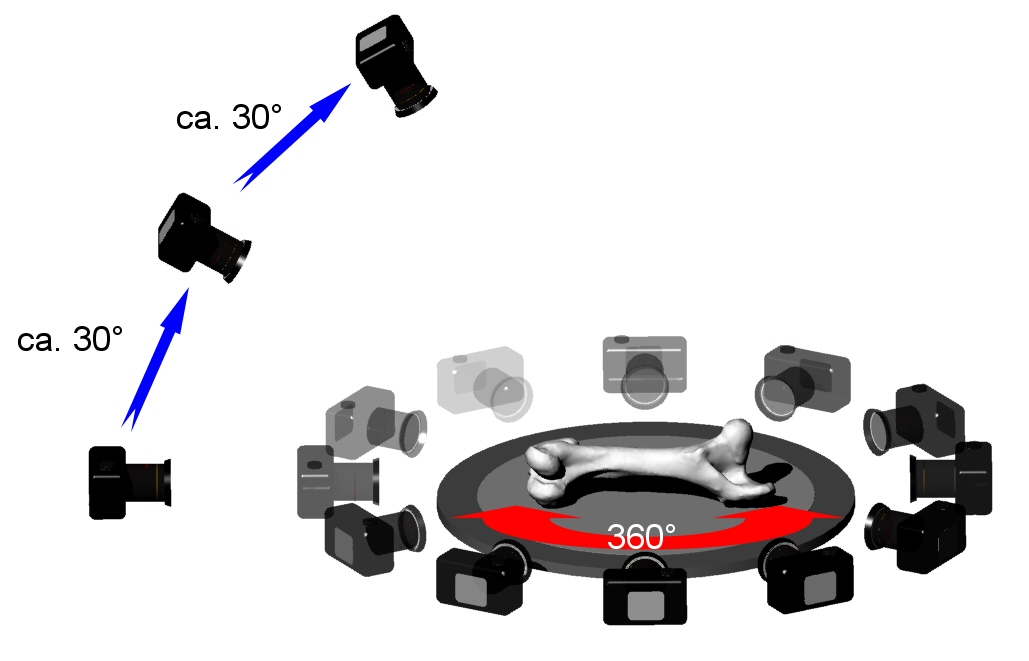
Mallison’s 3D CAD model illustrating good camera shots.
Photogrammetry tutorial 3 covers the use of turntables. He covers the type of specimens that work best, how to place the camera for the needed pictures and how to photograph with an eye for aligning the 3D models you create.
Photogrammetry tutorial 4 discusses techniques for photographing large, bulky specimens.
Photogrammetry tutorial 5 provides a ideo of the turntable method described in part 3.
Making the 3D Model

Part of a Diplodocus limb Dr. Mallison modeled.
Finally in tutorial 6, Dr. Mallison finally gets around to actually building the model from the photos. If this indicates to you that getting good photos is essential to making good models, you would be correct. To add more to this, the writers of the blog Sauropod Vertebra Picture of the Week, or SV-POW, have a series of useful posts on how to take good photographs, manipulating them for good effect, making stereoscopic images, and much more great advice.
In this tutorial, Dr. Mallison discusses some of the programs that are available. He prefers Photoscan Pro from Agisoft. The downside to this program is that it costs $549, which is probably out of the price range for many people. The upside is that it is a versatile program designed for non-specialists. He discourages use of Autodesk 123D even though it is free because all of your work becomes the property of Autodesk 123D. He also states that others prefer Image Modeler, which is the professional version of Autodesk. It can do more than Photoscan Pro, but it will cost you much more. He also mentions VisualSFM and Meshlab, open source programs which together can be used to make 3D models and provides a link to a tutorial by a fellow paleontologist, Peter Falkingham, who tells you how to use those programs.
From there, Dr. Mallison goes into scaling and aligning the models. If you want to see some of the finished work, try here and here.
Other Options
Of course, this isn’t the only wayto make 3D objects. Photogrammetry is only way to make quality 3D images. Laser-scanning is another great way to do so. If you have a few thousand dollars, I might recommend the NextEngine 3D laser scanner. It is not as expensive as some of the other laser scanners and does quite a bit at a comparable or better quality. As a caveat, neither the photogrammetry nor the 3D laser scanning will create the most detailed images. If you want truly detailed, high resolution images, then you really need a computed tomography, or more commonly just called CT, scanners. The downsides to that is that CT scans do not preserve the color of the objects, so you lose surface details related to color, and they are hideously expensive. But at least they are not as expensive as synchotron scans. Synchotron scanners are similar to CT scanners, but are much more powerful and can create images with much greater detail, but with only five available scanners, probably not something your average paleontologist, much less a hobbyist, is going to ever see.
Once you have your 3D objects of course, there is always the next possibility: 3D printing! For that, contact your local high-tech Maker Spaces, such as the Arkansas Regional Innovation Hub. There are several places you can go to buy your own 3D printer, such as Quintessential Universal Building Device, or QU-BD, in Little Rock, AR.
Full Disclosure: I have no monetary interests or any other vested interests in any of the people or companies linked to in this essay.

